Showing posts with label diy projects. Show all posts

Friday, July 1, 2011

Let's do some laundry

Growing up, my mom never let me do laundry.  I left for college without knowing how to work a washer.  I asked my mom numerous times to show me how to do laundry, but she's particular about things being done her way (I mean we all are at times, right?), so I usually didn't push the issue too hard.  Maybe that's why I like doing laundry and feel sort of oddly accomplished when I do it.  Plus, I'm a really awesome folder (no, seriously) and my tshirt piles are rather impressive. 

And maybe that's why I decided to make my own laundry detergent.  That plus hating how expensive detergent was and how fast it disappeared - and that I have a slight bit of hippy in me.  That's something my mom did teach me :)

So do you want to make your laundry detergent?  I used this tutorial and it was super easy.  You just need these 3 simple ingredients and a cheese grater.


(I found both the Borax and Washing Soda at my grocery store, but I had to order the soap from Amazon - still easy and cheap).

You measure out 1 cup of both Borax and the washing soda, do a little lot of grating (this was the hardest part for me, which I think speaks for just how easy this is), put it in a bowl, mix it all up, and VOILA instant laundry detergent!  Depending on how much I use (you're supposed to use 1 tablespoon, but for smaller loads I just guestimate) it smells fresh but not perfumey, or just slightly lemony.  But I love lemon so it all works out.  Also, the boxes hold about 5 cups each and I've yet to make a dent in my first batch of dergent that I made back in April.  So awesome.

What about the dryer you ask?  Did I go all crazy there too?  You bet I did.  Enter dryer balls:


These have replaced my dryer sheets.  They last years and years, help dry things faster by absorbing the water (they are made of super thick felted wool), and they're just plain fun.  I use 8 for big loads and 4 for smaller loads.  And I heart them.  I ordered my set from a shop on Etsy called Clean Sypria.  I saw numerous other shops selling them, but I liked that her listings include an awesome Q&A all about dryer balls and their benefits.  Plus you can get them scented if you want! (I didn't, but I might add some smell good some day).  Plus I never have to buy dryer sheets again!  Mother Earth and my wallet are both smiling right now.

Who knew laundry could be so much fun?!  Maybe that's why my mom held out on me all those years. 

PS: I have a good excuse for being MIA this time.  No really.  I'm moving to San Francisco.  More on that some other time.


Borax picture from Drugstore.com, Fels Naptha and Super Washing Soda pictures from Amazon.com, Wool Dryer Balls picture from Etsy.


Sunday, May 22, 2011

i love lamp

A long, long time ago (last Christmas to be exact) I bought a brown vase with the intent of turning it into a lamp.  Then, a few weeks later I was strolling through Marshall's home section and found the very same vase (on clearance for $5!), only it was clear instead of brown.  Now I could have matching-but-not-too-matchy-matchy lamps.  Heck yes.

Fast forward to me finding this tutorial for how to make a knockoff lamp shade of this Anthropologie one:

Well Defined Ensemble Lamp (for a mere $388!!!!)

I was sold.  So back in April, after buying 2 lamp kits for Home Depot, 2 shades from Target, and 1 dictionary, I ended up with these bad boys:

Off...

and on!

The lamp kits were $10 each from Home Depot and although I did have to get different size "stoppers" to fit into my vases (which my dad drilled holes into when my parents visited in April), it was super easy to assemble.  The tutorial for the lamp shade was also super easy.  The only thing I did differently was instead of doing random ripped up pieces of paper I used strips (which made mine bubble just a bit instead of laying totally flat, but I tend to like the not-100%-perfect look).  So basically, I made 2 bed side table lamps that I love with this budget breakdown (I had to buy just about everything):

- 2 vases: $13
- 2 lamp kits: $20
- 2 lamp shades: $12
- 1 dictionary: $5
- (I'm not counting those other stoppers we had to get because they were only like 50 cents or something and my dad went to Home Depot without me)

Total cost: $50

Take that Anthropologie.

Oh and one other note: if you decide to do a similar lamp shade, be careful of the pages you choose.  I tried to pick ones that had words that had special meaing (North Carolina, Southeast, and baseball all made the cut) I accidentally included a page that has a word that starts with "chla" and ends with "mydia." Funny how that word and chivalry were on the same page.

Wednesday, March 16, 2011

pretty shiny thing

My dad just called and this is how our conversation started:

Me: Hello
Dad: Hey what are you doing?
Me: Nothing
Dad: Um, you haven't blogged in a while.

Oh.  Right. 

So on that note, I have a coffee table to tell you about.  Get excited!

I know I mentioned the coffee table a few weeks ago, but this thing was/is a true labor of love.  Originally I wasn't a fan of the table because a) it was beat up and b) it's a half moon shape.  But the more I looked the more I realized I actually really like it's shape and tapered legs.  Plus it's free and it would give me something to practice staining on so it quickly became my favorite piece of furniture.

So when my dad came up over President's Day weekend, I put him to work.  He got to know the Norwalk Home Depot really well.

Here are some pictures of the wear and tear this table had been through (ps I took these with my phone in a garage with fluorescent lighting, so, yeah):


Sorry there's no picture of the shape yet, but pictures were always an after thought.  I was ready to attack this thing.

Step 1: strip all the stain and shellac and shiny layer off.  It was not pretty.  Once the stripper-stuff has set on the wood for a while, you strip it off with a scraper.  Here's an idea of how cool that was:


Pretty!  Clearly Dad was too busy for pictures as well.  Side note: this part is super smelly.  Like worry-about-your-brain-cells smelly.  We took multiple breaks since we were working in a closed garage with no ventilation at all.  More on that later.

Anyways, step 2 (which really might be like step 4 since we had to keep stripping that thing down) is sanding.  Sanding (with a sander) is so much fun yall.  I love it. 


This is about mid-way through the sanding.  We sanded and sanded and sanded some more until this thing was much lighter and felt like wood.

After wiping down with some mineral oil to get all the dust off, step 3 was to stain!  Hooray!  I wanted a nice medium brown color with a little bit of red and shine.  Lots and lots of shine.

On Tuesday morning when my dad had to leave, he didn't get to see the finished product because I locked the garage and had my keys in my room (and he left around 6am...) - oopsies.  So when I went down and checked it I was greeted with what we were afraid of: small hole-like spots where the stain had separated.  Check it out:


And a close-up:


After the 2nd coat we saw these spots but kept our fingers crossed that they would magically go away.  No such luck.  After looking back, we determined this most likely happened because a) it was in the 30s the day we stained and you're not supposed to stain below 50 apparently, b) there was no ventilation and um there's supposed to be adequate ventilation and c) you weren't supposed to do thick coats but um, I wanted instant gratification.  And one other thing to note is that we used a stain + polyurethane product instead of a separate spain and poly, so if we had used just stain this might have been different. 

Moving on.

Last week I got antsy and took this thing back out to the garage to work on it some more.  I sanded, re-stained, realized I needed to sand more so I wiped the stain off, sanded more, and stained for real.  And this is where we are now:


Say hello to our pretty pretty table!  He's almost done, but not quite.  A couple holes formed this time, but they are much less noticable so it's in the living room now and I'm seeing if it bothers me (and yeah, it's kind of bothering me).  Also, I realized the drawer and legs need one more coat - they just aren't as wonderfully shiny as the top.  And speaking of that - with so much shine, this thing reflects the TV like a lake reflects a sunset and it is so fun to look at.  Sometimes I catch myself watching the table and not the TV, but that might also be because I have a weird obsession with this table now. 

The good news is tomorrow it's supposed to be around 59 degrees (yeahhhh!!!) so I'll be out in the garage staining away.  Hopefully I'll have some finished pictures next week!

And that my friends is the story of my first staining experience.  Now I just sit around looking at furniture and dream about staining and painting.  Good news is I have a table from South Africa sitting in the garage just waiting for me to make it pretty.  Now I just really need Connecticut temps to not go back to the 40s next week.  Work with me CT.

Saturday, January 8, 2011

goodbye green and blue plaid comforter

One of things that I miss most since moving up to CT with Will is my awesome Queen size mattress that I bought at the beginning of my senior year of college.  Not only does it have a pillow top plus an extra memory foam pad, but I also got a sweet deal on it because, well, the man ringing me up wasn't the best at math and he was doing it by hand and... yeah.  Before you think I'm a terrible person, just know that my dad was sitting right beside me while this math went on and he didn't speak up either.  Okay maybe just a little bit terrible.

Anyways, getting to enjoy that bed for 7 nights - and plotting how to get it up here - combined with all this moving stuff (good news: we picked a place for January - July!), has made me think about how I would decorate the bedroom from almost scratch - if I could.  Then I remember the new place has faded royal-blue carpet in our bedroom so yeah, I won't be rushing on this because a) we'll be moving again in July and b) um, weird carpet. 

However, if I were to decorate the way I like, it would probably have this comforter


With a tufted headboard like this (but maybe in a darker taupe color?)


And with decorative pillows out of this fabric (which lucky me, I already own!) and maybe other fabrics with punches of orange?


And there would be a lamp similar to this, but made with the brown bulb vase I bought at TJ Maxx and maybe a tweed or burlap shade


With this clock on my bed side table


And a copper elephant that my dad is going to make will of course be found somewhere amongst all of this.

I will definitely be looking for that comforter to go on sale one day soon.  And now that I have a new work space to play in, I can totally make the vase lamp so it will be ready to go.  Another plus to moving is that it makes me want to go through everything and get rid of tons of clutter so I'm actually looking forward to moving this time.  Hopefully I can keep this positive attitude going strong.

Monday, January 3, 2011

trace face

A few months ago I realized how much I like old maps and globes.  I even posted about an old North Carolina map that I saw on Ebay and my dad got it for me for Christmas!  Well, one day I was trying to brainstorm fun ways to display all the places Will and I have lived.  After all, once the 3rd move within Connecticut was scheduled, I thought it would be nice to keep track.  First I thought it would be fun to do keys, but then I realized we hadn't kept up with those.  So then I thought what about a map of each place?  But then I would have 3 Connecticut maps and let's get real, I only need one of those in my life.  Plus it would be a little too map-heavy since maps are so big.  Then I remembered post cards!  And that brings me to this:


There are 6 because I thought Will should be well represented and he lived in Alabama, Mississippi, and Florida all before the age of 9.  Way to rack up those states bud.  All of the post cards came from Ebay, and most were free shipping and under $2. 

Anyways, as beautiful as these are, I didn't want to just frame them and throw them up on the wall.  So instead, I did a little tracing:


I traced them all and intend to scan them, make them all the same size, maybe change the outline/background color, and then get them printed somewhere like Kinko's on card stock paper.  Hopefully it will look like it does in my head: simple yet interesting and professional (much more so than the current state for sure).  I'll keep you updated.

Oh, and I knew tracing would be easy because I remembered back in high school when we had these tracing tables that were made up of a transparent top with a light underneath.  Then I realized I don't own one of those tables and I stalled for about 2 months.  Until last night when I had a light bulb moment.  Welcome to my tracing station:


See?  All you need is 2 boxes, a miniature baby lamp that always made you think "What do you do with a lamp that size?," 2 bar stools (Christmas tablecloth is optional), kitchen chair, tape (to keep postcard and paper in place), and the glass from a frame.

Happy tracing!

Sunday, January 2, 2011

girl needs to spray paint

Back in November my mom sent me a card and one of the things she wrote was, "I was thinking we should go to some second-hand shops while you're home."  If I told you this made me smile real big and do a little hop-skip right there in the post office, would you believe me?  You should, because I totally did.

Here are the goodies I picked up after we ventured out to 6 different thrift/second-hand/antique shops:


I love it all.  So much.  Anyone in the Pinehurst/Southern Pines/Aberdeen area, you should most definitely go to Adam's Thrift Shop and The Peddler in Pinebluff.  They are right beside each other and they have some super good deals. 

Anyways, I can't wait to spray paint the frame of that mirror and the big frame with the artwork (which I will be taking out).  I love big frames and mirrors but hardly ever buy any because they are usually so darn pricey.  The old milk bottle on the left will be a great simple vase for any flowers that you know, Will might bring home sometime.  Once all the other vases/flasks/bottles are spraypainted and attached to a piece of wood, the final piece will hopefully resemble something like this nifty little Stalagmite Vase from Urban Outfitters:


And speaking of gluing, sanding, and spray painting, Will and I looked at a potential condo for us to live in January - July and Will is already referring to the garage as my "work space."  Heck yeah.

Price breakdown for thrift store finds:
Mirror: $10 (Adam's)
Milk jug: $1 (Adam's)
Five other bottles/vases: $5 (Adam's; Peddler; and Pasttimes, West End)
14 x 16 frame: $10 (Michael's Auction Gallary, Southern Pines - going out of business)

Oh and I almost forgot one!  My mom bought a carved wooden Santa half off at one thrift shop and she got to pick out a free DVD.  Since my mom doesn't do technology, she let me pick one out for myself.  The lady suggested I get Austin Powers or Cheaper by the Dozen.  Guess what I picked?


Oh yeah.  Take that Cheaper by the Dozen.

Anyways, Kate and Amy and I also went to TJ Maxx after having lunch one day.  This was a big thing for me because a) I love TJ Maxx and b) it was my first time going to the TJ at home.  My poor little hometown is just getting so big.  Two parts fun, one part sad, and one part terrifying. 

Moving on, here's what I scooped up there:


I've been looking for a nice little drinks/breakfast tray, so of course I snatched this one up for $8.  Then I found the nice big bulb vase that I'm going to turn into a lamp with a standard lamp kit from either Wal-Mart or Home Depot and a shade that I'll find somewhere along the way.  Also $8.  Then I got those two little frames.  The one in the back ($8) will stay as is, aka far away from spray paint, but the silver one in front is definitely getting the spray paint treatment.  I plan on doing this one day:


It's just so interesting to look at it.  So fun.  Oh and no worries, I've already started collecting frames for this little project:


All but that pretty little one second from the left will most definitely be spray painted.  I mean everyone loves a sunflower, but still.  That one will get spray painted white.  As for the 2 silver ones, I haven't decided on a color quite yet.  The frames on the ends are from Goodwill and were a total of $5.  Perfect.  Oh, and the "Food for the Southern Soul" sticker won't be staying there, but I figured safely storing it somewhere would be a great way for me to not lose it.  I put my thinking cap on for that one.

How great is it going to be when I get that work space?

Saturday, December 11, 2010

christmas time is here

A few weeks before Christmas Will and I were at Wal-Mart (unfortunately) and I told him I don't like decorating for Christmas.  By the look he gave me, I wouldn't have been 100% surprised if he broke up with me on the spot.  He looked heartbroken.  Then I told him that what I don't like is having to unpack things, pack up normal decor things, put Christmas stuff out, and then in 3 and a half weeks pack it all up again only to have to get your normal stuff out again.  I partially blame my mom for this feeling because she too feels this way and has left more and more holiday decorations in the attic each year.  In her defense, we have some very crafty family members so each year my mom was given more and more decorations and the amount she accumulated is pretty overwhelming.

Anyhoo, surprise of all surprises, when Will and I got back from Thanksgiving I couldn't wait to break into my Christmas box.  I'm pretty sure I was excited because it meant that our plain we're-only-living-here-for-3-months-so-why-bother-decorating apartment was going to look a little more home-y.  So, here's what I managed to do with an Italian styled apartment, no mantle, and little money:

The book case


Some of these vases were out already, but I went to Michael's and picked up some fake flowers to add some holiday color and picked up the Christmas candle from Target.  Coolest thing about the candle: it has a wooden wick so when it burns you can hear it crackle.  The first time I lit the candle all I could think was "Chestnuts roasting over an open fire."

The coffee table


I didn't do much here partly because I never got around to doing this pop-up book art Christmas scene that Kara Paslay shared on her blog and partly because I just didn't want much on the coffee table.  So it's simple, but I do love that gold glitter candle.  Oh, and in my defense, at one time the other votive (that is now on the bookcase) was also on the table and there was another white candle exactly like the one above, but it found it's way to the trash can because it now looks like this:


The "mantle"


Cheap-o stockings from Target with glitter paint yessss.  Classy.  Oh and Tom's medals he's won in races he's done because those are always out and I wasn't going to be mean and take them down. This was about all I could do because our mantle actually consists of 5 spaced out, protruding stones:


Cool huh?

The fire place


Next year I definitely want a life-size real tree, but I do have a special fondness for baby tree.  It's sitting on a bar stool that I wrapped in a paper table cloth from Target.  Oh, and only 4 of these presents are for Will and I (the rest are for our parents!). My NC Christmas ornament found a new home with my UNC snow man that my mom sent me last year on the fire place gate.

The kitchen doorway


Another thing I took from my mom: taping up Christmas cards on the doors (or in my case, marble walls).  Most of these are for last year, but I'll be adding this year's as they come.  Cards are the best.

The dinner table


And finally, the table cloth, plate, santa mug, and napkins that my mom gave me last year.  Please ignore my almost bad bananas - those are going in a smoothie tomorrow morning - and my veggie and coozie bowls (and don't worry, that weird pumpkin bowl that's holding the coozies does not belong to me).  Oh, and that plate should have cookies on it, but I postponed baking until tomorrow.

So maybe it's pieced together and a bit cheap, but I'm okay with that this year.  Besides, nothing will ever top this:


This picture is actually missing 2 stockings because I took this on July 27 (yes, it stayed up that long because we loved it that much) and they had already moved out.  Sorry Beth and Kelsey!

PS: I just compared my current stocking with this stocking and realized that the next time I break out the glitter pens, I need to get a little more creative.

Thursday, December 2, 2010

there's an elephant in the room

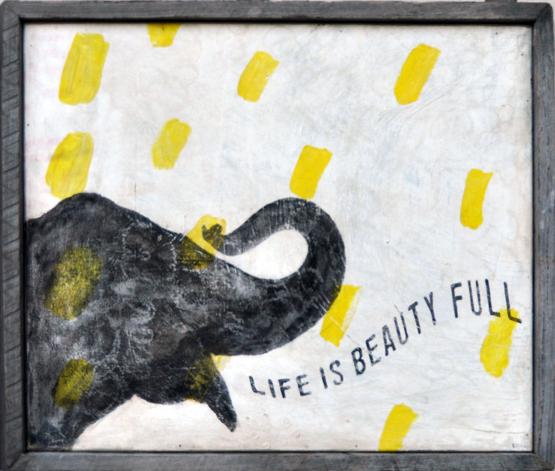
Remember this guy?


Remember when I talked about wanting to do my own painting just like this?  Well guess what:


Yes yes yes!  While I did make a few changes and while my elephant isn't perfect (I freehanded it), I am very happy with the first painting I've completed since my freshman year of college.  Although I must admit it was pretty darn simple:

1) I dry brushed white acryllic paint on the canvas, just enough to cover the whole canvas.  Once it dried (which happened quickly since there wasn't much paint), I dry brushed/streaked some black over the white - not a lot and trust me, it didn't look pretty at this step.  When that dried, I used my painting knife to build up the white to add texture and make the canvas look a little worn or antiqued instead of it just having weird streaks of black.  (The lighting in a basement apartment isn't great, so just believe me when I say you can see said texture and worn-ness).

2) Next step was doing the yellow bits.  Again, I just took the painting knife, got just a bit of yellow, and scraped away.  I added the red because I wanted them to stand out a bit more.  But then I got a little knife paint happy, so I ended up painting over 3 bits with white and redoing the yellow lines again.  No biggie.


3) Then I just looked at the original as a guide and free-handed the elephant lightly in pencil.

4) Then came the watercolors!  FYI, painting knives and watercolors are some of my favorite things to work with.  I ended up doing 2 coats of watercolor on the elephant (and I'm still debating doing a third to make the elephant darker and changing it a bit around the mouth).

5) Lastly, I very lightly free-handed the words, mixed up the blue, and carefully painted away.

And there you have it!  Now I just need to figure out what's getting painted next.  Muahaha.

PS: Over Thanksgiving I read Water for Elephants.  Obsession overload.

Friday, November 19, 2010

obsessed

Okay you might not know this yet but it's probably time I share it: I have a slight obsession with elephants.  Let me tell you, Will is super excited about it.  First it started with the salt and pepper shakers I wanted.  Then came the 2 elephant "statues" I got at Ross while I was there with my parents a few months ago - they totally thought they were cool.  Even stuffed animals are getting my attention and that has happened since I was like 12 years old.  Everytime I see an elephant these days I point, smile giddily, maybe jump up and down, and squeal "Look Will!!! An elephant!"  Like I said, he loves this new development.

But last night I hit the mother load.  While perusing the print shop I discovered on Urban Outfitters, I found this guy:


Even Will likes this one!!  Those colors, those flowers, those lines, those bubbles, those swirls - it is exactly what I would do if I had only thought of it first.

So yes I'm in love.  I'm also in love with this print shop I discovered.  There are so many good pieces and they are so reasonably priced.  I would love to put this collection on my wall, in this way:


Clockwise from left: buffalo, rhino, elephant, and black sheep.  Picture frames.  Picture maybe switching the elephant with the rhino.  Picture my smiling face everytime I would see this. 

Before I go crazy and order all of them go, I'm going to challenge myself to try and draw something similar to the elephant print.  Sure I might have to trace an elephant since real life was never really my thing - I'm an abstract and random design kinda girl - but I actually think I could do something pretty close.  So while I'm sitting around watching football and desperately cheering on my fantasy team, picture me drawing an elephant.

All images from Urban Outfitters Print Shop

Update: I just found this image on Sugarboo Designs:


I want to sit on the ground on a table cloth and paint this immediately.  Come on weekend!

autumn blues

Not to be a drag and all, but I’ve been feeling a little down recently.  This usually happens when the weather turns colder and it gets dark so early outside, but this year it’s been especially frustrating.  I think I’m maybe a little too excited for Thanksgiving break and spending time with family, so it’s making each day even that much harder to get through.  Add to that the move and the fact that a) our previous landlord is a sucky person (LC always was my favorite) and b) our apartment still isn’t totally put together, and I’m just a wee bit burnt out.  Okay just had to get that out there.

I’ve started working on a couple crafting/diy projects but have hit a few snags along the way ie I need glue, a ½ inch drill bit, and a place to spray paint.  But if I did have all proper equipment and all the space in the world to work, this is what I would do:

1)  Paint a rug.  Yeah, when I first saw this tutorial by Sarah on how to do it I thought “Eeeks, I don't want to walk on paint.”  But she convinced me that if you do it right, your rug will stay nice and pleasant.  Besides, we aren’t talking about painting a shag rug here so really how much coziness is there to lose?

These are rugs that I think would be fun to imitate:


Rug images from Anthropologie and Surya - and although some have a metallic sheen don't worry, that was just my computer's idea of a funny joke

2) Paint paintings.  I’ve always been crazy over paintings and prints that incorporate letters and words.  Maybe it’s because I used to consider that one of the things I did best in art class – tell me to take my initials or favorite letter and make it interesting and I was one happy happy girl.  I also like flowers though too, but not in the still life flowers-in-a-vase-on-a-table way but more in the add-flowers-but-don’t-make-it-a-painting-of-flowers way.

These are "word" prints that have caught my eye:

All images from Sugarboo Designs

And these guys have flowers:

From left to right: Urban Outfitter's Print Shop, Anthropologie, AnthropologieSugarboo (I'm pretty sure I could do something simliar to those Anthro ones, and therefore not pay the combined $1,198 for them)

3) Build furniture.  This is probably years down the line but seriously, how cool would it be to see a piece of a furniture in a store, look at the price tag and think “I could make that.”  It would be so cool!  I just love the idea of building from scratch.  It’s kind of like when I cook: even if it doesn’t turn out perfect, I’m pretty pleased with myself.  And I think since furniture stays around way longer than food does that satisfied feeling would be even better.

Here are some pieces I like:

From left to right: Unknown and unknown (I got both images from RueLaLa), Urban Outfitters

So that’s how I’ve been spending my time recently: dreaming of non-cold, non-Connecticut days when I can paint and sand and drill to my heart’s delight.  While that sounds fine and dandy, I think I need to try and live a little more in the present.

Thursday, October 28, 2010

about that sewing machine...

Okay when I said I wanted a sewing machine I definitely wasn't kidding.  And on that note, let me introduce you to the new fabric in my life:


So here's how this all came about.  Step 1: Allison sees coffee table ottomans and becomes semi-obsessed.  Step 2: Allison finds coffee table on Craigslist and convinces Will it will fit in his car.  Will holds back anger when the coffee table didn't fit in his trunk, and then shakes his head in annoyance/awe when it fits in the backseat of his car - with max 2 inches to spare.  Step 3: Allison innocently looks up fabric on Fabric.com just to you know, see what's out there.  Step 4: Sale on Fabric.com?!  Oh my gosh!  Step 5:  Allison (and Will) agree on 4 fabrics they like (coffee table and pillows) and next thing you know, fabric is ordered and arrives at the house.  Crazy, isn't it?

Navy burlap will be the color for the coffee table.  Originally I wanted a pattern and something light colored but then I remembered a) a tray for spillable drinks and b) feet, and realized that my favorite color navy would be perfect.  Then I saw that chevron, and those dandelions, and that taupe and gray pattern with great texture.  Now I'm not saying I'll use all fabrics for living room pillows (after all, they'll need a sofa to sit on, preferably one covered with fabric), but I am thrilled to have so many options that I love.

And one day I will be thrilled to turn them into something more than folded up fabric.

Fabrics clockwise from left: Premier Prints ZigZag, Premier Prints Chipper Texture, Burlap, Premier Prints Dandelion

Side note: This is the first time I realized the 3 patterns I picked are all the same brand.  I guess I just found a go-to brand, huh?

Saturday, October 16, 2010

sew sew

Whoa whoa whoa.  Scratch that whole infinity scarf I posted in my Christmas list part II.  That was crazy talk.  Why?  Because I could get a sewing machine instead and make all the infinity scarves I want!

Not only did I find a great how-to for making infinity scarves on Meet Virginia Design, but I also have a strong desire to make pillows.  Since I'm so picky about colors/prints and I change my mind so often, making my own slip covers for pillows or scarves seems like a great idea to me!

If I were to get a sewing machine, I think these fabrics might find their way into my life in one way or another...
Update: I've found all new fabrics to love.  See why I seriously need to be able to make pillow slip covers and my own scarves?